
Total make-over of upstairs bathroom – tick!
Oh, if only it were that easy!
If you’ve been following this blog for a while you’ll know that we started this project, part-time, back in February.
Ever since we first moved into Moulin de la Roche, last October, we’ve been intending to totally re-do the main bathroom as our first priority. The large room, full of natural light is lovely, but (call me picky) the faded turquoise vinyl wallpaper covered in pink water lilies and leaping dolphins, the rusting shower enclosure covered in black mould and thick gobs of discoloured sealant (presumably to combat the numerous leaks) were not exactly to my taste.

The bathroom – before
After the renovations of numerous previous homes, you would think I had learned my lesson. Stick to the KISS theory of design (Keep it Simple Stupid). But … nah!.
After immediately stripping the aforementioned wallpaper and fired with destructive fervour, we realised that we had no idea how the plumbing was put together. So we had to do some research, didn’t we?
All the stone walls of this centuries’ old water mill were dry-lined by the previous owner when the building was converted from a factory mill in 2001 to a residential property. All the plumbing had been installed behind these false walls so we didn’t know where the water/heating/drainage pipes went. Added to that, when we drilled through the bright yellow tiles on the floor we discovered that the upstairs floor was 10cm thick concrete, with a large void between it and the plasterboard ceilings of the rooms below.
It was something of a disappointment to discover that all the huge original beams hidden behind plasterboard boxing-in were in fact steel RSJ replacements from the earlier conversion. Oh well, at least we didn’t have to worry about woodworm. The white-washed, oak-beamed mood board quickly morphed into a more contemporary design!
I was adamant that I wanted to install a large free-standing bath in the hitherto bath-less bathroom, as well as a big walk-in shower, which meant running the water supply and drainage to the opposite side of the room. It would obviously be easier to approach the task from below, so without further ado, we removed the bath, interior wall and a fair bit of the ceiling from the bathroom downstairs, to gain access.

…and so now the downstairs bathroom is wrecked too!
In so doing we discovered that the drain from the existing shower upstairs was no longer attached to the waste pipe so every time we showered, the water was cascading down between the inner and outer walls of the room below, eventually soaking away, somewhere (?) This was actually a great relief as it explained the damp in the downstairs bathroom and was a lot easier to put right than we had originally thought.

The shower cabinet is out
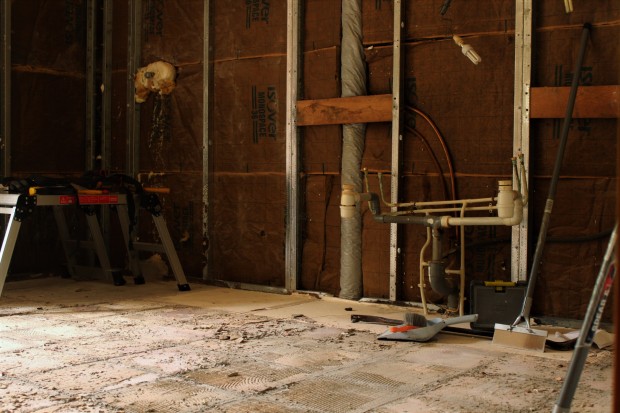
Back to the bare bones
Armed with our new understanding of the plumbing system, we removed rotten plasterboard, installed new pipework and taps for the sinks and shower, built a new false wall and ran water and drainage under the floor for the new bath.
The brown, greasy, nicotine-stained bare bulbs that the previous owner had not thought to replace with light fittings in the 15 years he had lived there were replaced with downlights which give lovely warm pools of light in the room.
We spent 2 days removing the floor tiles and chiselling off the old adhesive, before deciding to level the floor with self-levelling compound, then laid oak plank effect ceramic tiles.
The walls were tiled with stone effect ceramic tiles and the new shower enclosure installed.

Tiling almost finished
The leaking washbasins on their wobbly brick support were exchanged for an American oak sideboard, picked up in the Park Furniture sale, back in the UK, and topped with new countertop sinks, sourced from the internet.
We were under pressure to finish the bathroom as we had 4 guests arriving to stay in 6 weeks’ time and as we had also destroyed the yucky-but-functioning bathroom downstairs we felt we should at least have somewhere for them to shower. Having worked flat-out during August we were getting close but disaster struck when we discovered that the last two boxes of wall tiles (which I had ordered separately, having decided that I would tile an additional wall) turned out to have been smashed to smithereens by a courier driver presumably practising his shot-putting skills when loading the van.
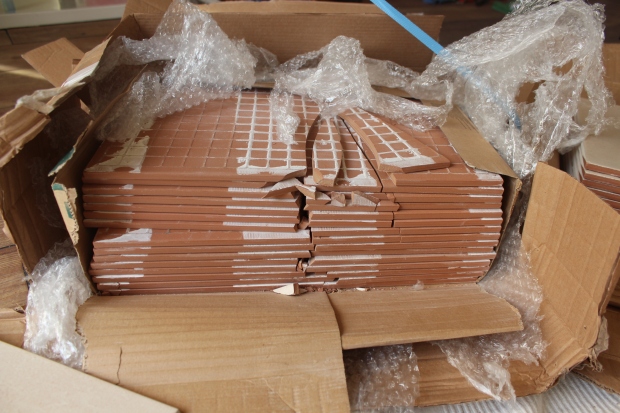
So close to finishing, then disaster!
The large red lettering on the parcel tape covering each box, denoting that the contents were FRAGILE, had obviously not deterred him.
I emailed the supplier, Walls and Floors, who immediately replied to advise that they had dispatched two replacement boxes, (but to our address in England where we had ordered the first lot from) Luckily my son was able to intercept them and they were waiting with him, for collection. So we didn’t manage to get the tiling finished and the bath in before our visitors arrived but at least we had the shower and sinks working.
After a pretty full-on week back in the UK for work commitments at the end of October, we packed up the van and headed back to our moulin to finish the bathroom. A Thonet-style bentwood café chair from Ebay and a few new storage solutions later and we are really happy with our new bathroom. What do you think?
( Just to say that we have not been sponsored in any way for this post. I have mentioned suppliers for your information and because I have been impressed by the quality of these companies’ goods and customer service.)

…..lol……..just a little job then 😀😀👏🏻👏🏻👏🏻👏🏻
LikeLike
Ha ha! We don’t do things by halves, Val. Next job is creating a new bathroom downstairs…watch this space!
LikeLike
Oh Ella it looks absolutely fabulous. I love all of it. But I think the oak effect floor tiles are particularly fab. Well done to you and Colin you’ve done a great job. I hope you really enjoy it.
LikeLiked by 1 person
Aw, Thank you. Colin says it’s too posh for him to use, now. Guess I’ll just have to put a bucket of cold water out for him! 🙂
LikeLike
Looks incredibly beautiful and zen with not a hint of the blood, sweat and tears that went into it! Congrats on a job well done!
LikeLike
Thank you! We’re now planning the downstairs bathroom, which will involve reconfiguring the downstairs and bashing out walls. Where’s my hammer?
LikeLiked by 1 person
To be frank I’m a little shocked that you didn’t keep the original 😉 Seriously, the transformation is stunning. I love the fittings and all the touches (like the Edison Lights) that give it such warmth whilst being a really clean space. Chapeau to you both …. I can feel the pain reading the article but it was SO worth it 🙂
LikeLike
Well, it certainly had a strange charm to it…but I prefer our version 🙂
LikeLiked by 1 person
Fantastic work! Looks wonderful, love the use of the sideboard. Look forward to what you do with the downstairs bathroom. X
LikeLike
That turquoise vinyl wallpaper is quite something!! Looks like all the hard work on the renovations paid off – it looks fantastic now 🙂
LikeLike
Thanks Rosie. It’s lovely to have somewhere to soak away the aches and pains of a long day’s DIYing 🙂
LikeLiked by 1 person